Total Pageviews

Showing posts with label tubs. Show all posts

Saturday, March 1, 2014

A good haul

Bought these on Craigslist from a reefer.  

Not what you think, while these are hydroponic sumps, commonly used in growing pot, the reef keepers use them to grow corals.  There are eight 120 gallon 4x4x1 foot sumps. 

Unfortunately, the six custom made 4x2x1 foot, 60 gallon acrylic flat tanks are painted white to increase illumination for the corals. That will take some effort to remove. 

This totals 176 square feet of surface area, all one foot deep for 1,320 gallons capacity. Going to need to build another greenhouse. 


Monday, February 24, 2014

A newly completed rack


This new design is as simple and efficient as possible.  It is built on the Costco Racking, with MacCourt Super tubs.  The tubs are 36x24x8 made of molded polyethylene, by MacCourt here in the USA.  They are available through Ace hardware and sometimes Lowes.  They are much sturdier than the PVC utility tubs made in Israel, sold by Home depot.   They are very sturdy and with just a few lath strips can overhang the rack a bit, allowing for three tubs per rack instead of just two per shelf.

The tubs are very simple to drill and drains are via one inch bulkheads.  The Rack is topped with a 135 gallon acrylic aquarium and is plumbed to the central filtration system.


Monday, May 21, 2012

Laguna PT796 Ponds 8x

Just picked up 8 more PT796 injection molded Laguna tubs. That makes 18! They stack and unstack so well.

Laguna Rectangular Basin, 180 x 120 x 60 cm (70 x 47 x 24 in), 950 litres (250 US gallons)

Monday, October 10, 2011

Blue Tubs Removed

Draining the system.  A nice batch of Bristol (Parker) Spawn 2 came out of this tub.

Itoh and Hattori in the corner.

Blue Egg Phoenix and Bristol mutants in the left tank.

Moving out.

Site resurfaced with 1/4" #10 gravel.  Two Large Laguna tubs will move back in here.

Sunday, October 9, 2011

Hatchery Tanks Completed

Completed Hatchery Tank

2" x 3/4" Recirc Supply.  1/2" x 1/8th" Air.
Ready for fish.

Supply Valve.

2" Primary Standpipe.

6" secondary standpipe.  Itoh and Hattori (Hater) '10.

The drain infrastructure.


Tuesday, October 4, 2011

Hatchery Tank Filling

Wow, a one week turnaround. Picked them up last Monday and am filling the first one a week later.

Hatchery Tank Standpipe


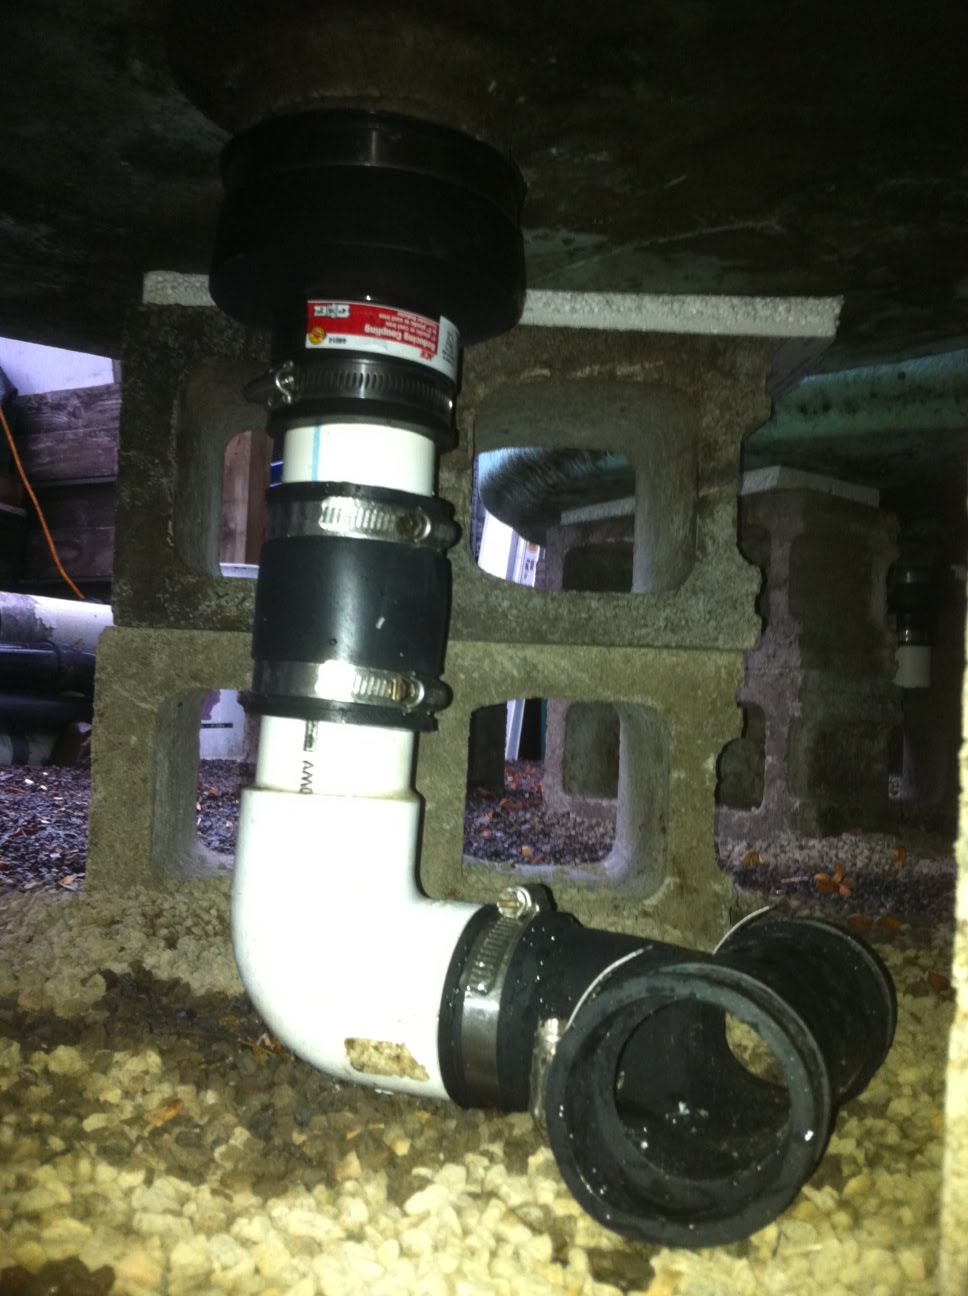
The tanks have a built in drain nipple to receive the primary and secondary standpipes.  This system was old and set up for flow through so leaks were to likely to be used in recirc.  From the bottom a 4"x2" Fernco was attached to the fiberglass nipple.  A two inch pipe 8 inches long with a couple glued to the internal side was passed through the fernco.  

The foam expanded and made the standpipe couple fitting very sturdy.  The small sump around the couple is to receive the original aluminum secondary standpipe that allows for bottom collection.  The couple was set to be even with the bottom of the tank and Great Stuff expanding foam was used to fill the space between  the 2" pipe and the inside of the fiberglass nipple.  The couple even with the floor is the new receptacle for the 2 inch primary standpipe.

The primary standpipe is 28 inches tall with the top 3 inches slotted to retain the fish to a depth of 24 inches.

The secondary standpipe is aluminum and in need of a new powder coating.  This stand pipe is installed for bottom collection of water and solids for heavy loaded tanks.

A close up of the secondary standpipe base showing the intake holes even with the floor of the tank.  The water will be flown tangentially creating a circular flow bringing the solids to the center for better solids capture at lower flows.

See the whole project here.


Hatchery Tank Drains

These are subcomponents of the drain manifold for the hatchery tanks. Rigid PVC and flexible Fernco tees were alternated for ease of installation. Appropriate lengths of pipe will be glued into the PVC and attached to the ferncos. The ferncos add expense but save in the long run for ease of repair and reconfiguration.

The 2" couple is slid up to attach to the bottom of the tank. The fernco tee attaches the tank to the main drain line back to filter.

Same set up with a PVC tee that lengths of pipe were glued into to create the drain line.

4"x2" Fernco attached to the fiberglass nipple on the bottom of the tank, 2" pvc standpipe projecting through the bottom, with a 2" Fernco couple attaching to the elbow and Fernco Tee.

A look at the PVC version. The PVC and Fernco tees are alternated every other tank.


Sunday, October 2, 2011

Setting the blocks and hatchery tanks


The site was leveled with 1/4" #10 gravel (Asphalt feed stock) and cinder blocks positioned with the aide of a isosceles triangle fashioned from the cross bars of the prototype Thorens Aquatics Zebrafish Rack.  Simply bent some wire through existing holes.  There was even a center hole to aide in lining up center rib of the cinder blocks.  This made placement of the blocks go much quicker and more accurately. 

One inch styrofoam pads were placed between the cinder blocks and the tank.  This protects the tank and allows for some slop in the placement yet keeps firm pressure against the bottom of the tanks keeping them very stable.

The tanks in place and leveled.

The Bug helping Dad level the tanks.  Has his fishy colors on today.


Saturday, October 1, 2011

5 cubic yards of 1/4 #10 gravel

The tank yard has had a large 1" to 2" river rock ground cover since I've lived here. It was used as a dog run. The hatchery fiberglass tanks have bottom plumbing and sit on cinder blocks for legs. To level the site, 5 yards of 1/4 inch #10 gravel (asphalt aggregate) was spread out to make a level base for the tanks and to cover the river rock.

The old rocks were uneven and would trap debris from fir and cedar trees.

The hatchery tank area with cinder block legs.

A row of cottage stones were added next to a side walk to contain the new gravel.

Got halfway through the pile.